Tuesday, 7 November 2017

For Something a Little Different.

 The caterpillars that I posted yesterday were all butterfly larvae, which are usually not very hairy. Moth larvae on the other hand are very often extremely hairy. The one above, belonging to a Cup Moth is spiky rather than hairy however, but look at the amazing colours and patterning!
 These different moth caterpillars are sometimes called woolly bear caterpillars because of their very woolly coats of course. I have no idea what sort of moths they will turn into.

Monday, 6 November 2017

Who is Eating my Mint Plant?

I noticed that there were large pieces missing from my healthy looking mint plant, and it didn't take me long to locate the culprit, this large bright green caterpillar. It may be the larvae of the ubiquitous Cabbage White butterfly, but I have my doubts. It's a much brighter green than those caterpillars usually are, but then it's not eating dull old cabbage leaves, but somehow it doesn't look quite right to me.
 Below is the Cabbage White Butterfly that we all know, this time on a Loquat tree flower.
 This beautiful butterfly below is a Dainty Swallowtail, previously called a Dingy Swallowtail. I think that the new name is far more appropriate. 

 The caterpillar above left is the Dainty Swallowtail larvae and the one to the right belongs to the Orchard Swallowtail, the butterfly seen below. Both butterfly larvae feed on citrus fruit leaves, but the Orchard Swallowtail rarely ventures south a far as Melbourne. With global warming perhaps we'll see this splendid butterfly in our suburban gardens  competing with the smaller Dainty Swallowtail which is reasonably common in Melbourne during the summer.

Sunday, 5 November 2017

Garden Pots.

This is a little corner of my back garden where lots of plants are in flower and where I seem to have a mini collection of earthenware pots. While they are a nuisance because they collect rainwater and provide a home for mosquito larvae, I really love the juxtaposition of plants and pots, as evidenced by some past embroideries of mine.
 I can't identify most of the plants here, but I do know that the front right are nasturtiums. The background is an automatic stitch on my sewing machine and the rest of the stitching is free motion machine embroidery.
Some years a group of 10 (I think) embroiderers from the Embroiderers Guild Victoria were nominated to take photos of a Melbourne garden, produce several textile works reflecting the garden and to mount an exhibition as a fund raiser. For quite what I have forgotten I'm afraid. The garden was open during some of the time that the exhibition was on, and it was all a great success, selling 40 of the 42 textile artworks that were on sale. This work above shows a corner of the house and some huge concrete pots.
 I loved this shady corner of the garden, with flowering hydrangeas reflecting the blue of the pot, orange abutilon and the large tree behind. I have no idea what the ground cover was, but it was very densely covering all the soil.

Wednesday, 1 November 2017

Rescue?

I was hesitating about throwing these prints out because of the waste of expensive printing paper, so I decided to paint the grasses and see what the image looked like.

 It is certainly an improvement, but I'm not sure how appealing such an image might be at an exhibition. I need some more contrasts or something.  Thinking............
                   You can of course click on the image for a slightly larger version.
This is a print using another collage plate that I wasn't happy with . It wasn't looking too bad until I made a bit of a mess in the lower middle. Perhaps I can chop out the better bits to use in something else ! I'm still not quite sure about painting the prints, but it's been an interesting exercise.

Tuesday, 31 October 2017

The Rose.


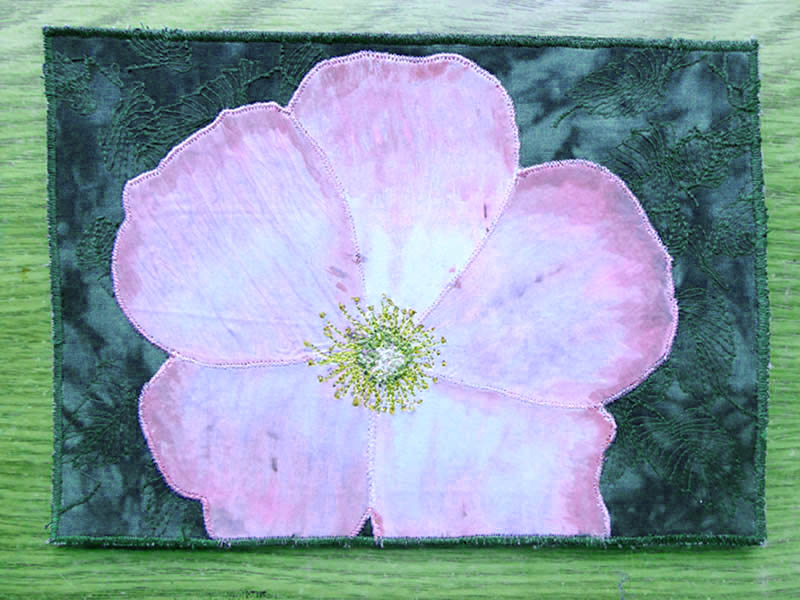
I found it very hard to photograph the rose this morning, the colours just aren't right ! Anyway, it's finished and with a little bit of extra paint on the outside edges of the petals, it has come up reasonably well.

Monday, 30 October 2017

Back to the Textiles.

 With only a day to go before the end of the month I thought that I had better get on with my flower for the month of October. I spotted a pink and white rose in a garden nearby and thought that it would fit in with all the other flowers that I've done so far. I found a pink and white silk scarf that I had dyed many years ago and never liked, so decided that as the pink was about the right shade I'd cut it up for the petals of the rose.
 Although you probably can't see it in the photo, I've stitched leaf shapes on the background using the automatic patterns in my ancient Pfaff sewing machine. The machine is decades old, but is my trusty day by day work horse. With all the petals fused into place and the edges of them stitched, together with the outline I started to sew the central area.
With the stamens done it only remains to be backed and edged in satin stitch to be pronounced finished.

Sunday, 29 October 2017

Two Steps Forward & One Back!

Flush with the success of the last printing session, I went ahead and made 2 larger but somewhat similar collograph plates. Here they are glued, sealed and painted with gesso ready to go.
 
 The faint colour showing through is the colour of the original mount board scraps that I had to hand. Once again I have used pressed grasses and the mulberry bark pieces.
 First print is very disappointing, too dark and the grasses are very indistinct. What a waste of good sized printing paper!
 This one is a little better, but still not up to much. I decided to reprint one of the successes of the last session just to see if it was the plate at fault or the different paper that I was using.
Hmmm, this is actually better than the previous print, so it's definitely not the paper. It must be that the plate is at fault. It may be that the grasses are too thick and the mulberry bark too thin so that it doesn't create the obvious vine like marks of the print above. I won't abandon the poor prints completely, with the cost of the paper to consider, so I might try a soft water colour on the paler ones. It looks as if I need to make some more plates and really concentrate on the elements not being too thick. Back to the drawing, well collograph board.

Wednesday, 25 October 2017

That's More Like it!

I decided that the collograph plates needed more texture, so I coated each one in Gesso, then covered it under pressure with cling wrap.  The gesso didn't dry under the pressure, but did take up the texture from the plastic wrap which stayed there as it dried.
 
 The resulting prints are much more what I had in mind, but even so there is room for improvement!
 Plate one with just 3 heads of our native Kangaroo Grass, and some strands of mulberry bark teased out and added in the lower area.
 This is the print from the second plate with more grass seed heads and a little rub of yellow paint at the top. I like that the mulberry bark has taken up such a lot of ink, as it seems to anchor the larger grasses and give a good bit of contrast.
   This is the ghost print on a very much lighter weight paper, which gives quite a different effect.