Friday, 29 September 2017

Oldie but Goodie.

On a clearing purge recently I took out my original trusty 1960s Singer sewing machine from the bottom of the wardrobe. I bought it in about 1962s as a demonstration model from a city shop, so I saved a bit of money from my meagre pay packet.
 It was a very innovative machine for its day, being (I think) the very first free-arm sewing machine made. It could do all sorts of amazing stitch patterns with the addition of plastic cams to the front of the machine. You can see the black disc behind the fly wheel in the photo below.
 
The machine can do free- motion stitching with the addition of a covered throat plate to eliminate the drag of the feed-dogs, and as with most of the old Singer machines it came with a ruffler and various other specialised feet.
 With the cams added it could so many decorative patterns as evidenced by the pages of patterns shown in the booklet. This is just one page spread of many!
 This is the box of cams, all present and correct, a shame that one corner of the original box has been broken.
I had thought to sell this machine, but I really don't think that I can part with it.  So many memories of things sewn with it, from my wedding dress, childrens' clothes and household items such as curtains, cushions and bedspreads to butterfly nets and shade cloths.

Tuesday, 26 September 2017

Flower for September.

If you have looked into my Blog from time to time over the year you will have seen a picture of a textile flower each month taken from a garden that I have visited during that month. Below are 2 strikingly marked Hellebore flowers from the Garden of St Erth that I visited last week.
Below you can see that I chose to work on a flower that has already formed seed cases in the centre, rather than the more complex stamens etc shown in the flowers above.

Sunday, 24 September 2017

52 Years in the Making!

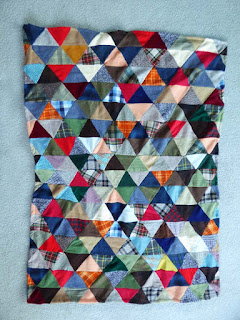
I started this woollen quilt in 1965, having had no experience whatever of patchworking. I did make all my own clothes, so I had a lot of left over fabric which I carefully stored away. For whatever reason I decided to use some of the warmer types of fabric remnants to make into a quilt, without any idea of how to proceed apart from cutting triangles. As you can see, the triangles aren't accurately cut to size, so that the whole thing is decidedly oddly shaped!
 
 
I was recently persuaded to add a backing to the 'quilt' to at least make it usable as a knee rug perhaps. Today I did that, but it really was rather difficult with the odd shape of the item. Having made a fair attempt, I'll leave it at that, knowing that the Quilt Police will never get to see it to pass judgement! It's fun remembering what bits of fabric came from what garment made all those years ago.

Friday, 22 September 2017

Yellow.

 This is the garden at St Erth, Here which we visited in glorious sunshine today. Quite a contrast to our visit to Coombe Cottage earlier in the week. The daffodils here in the sunshine are all out and looking magnificent.
               However, these in the shade have a week or 2 to go before being all at their best and providing a wonderful sight.
                                  I've never seen a yellow violet before and it's quite charming.
Being in a frosty area the gardeners can grow the English Primrose which wouldn't grow well down lower in the Melbourne area. These at St Erth in a shady corner were doing very well.
Although not really yellow, these Gunnera shoots caught my eye. The plants had been cut down for winter and these prehistoric looking shoots were well on their way out in the spring sunshine.

Thursday, 21 September 2017

Dame Nellie Melba.

It was a very cold and windy day yesterday for our visit to Coombe Cottage, the home of Dame Nellie Melba. http://thedesignfiles.net/2015/12/coombe-estate-the-garden-of-dame-nellie-melba/
We did manage a walk around the garden, but the chilly wind soon sent us indoors.
 
As the original house that Dame Melba lived in is still used by the family, her great grandsons, the Lords Vestey, we were unable to see inside, but I thought these 'peacock' chairs on the porch and bought by Dame Nellie were fantastic!

Not far from the chairs is a huge and over a century old oak tree the branches of which spread over 25 metres. To help support such a length of branch, gardeners have spliced one branch onto another as a brace. You can see the smaller branch coming off the trunk and growing across to the left and joining onto a lower and heavier branch. Very clever!

Tuesday, 19 September 2017

Gazanias.

 Right now my garden is looking lovely in the early Spring sunshine. I'm particularly pleased with these Gazanias as I grew them all from seed, and it's taken 2 years for them to flower well.
                          The variations in colour and form are amazing as you can see.
 This one isn't quite fully out yet, but it will only take a few hours for the petals to completely unfurl.
     This one is a little smaller than most of the others, but it's double array of petals is lovely.
        This one has rounded petal tips rather than the pointed ones of the other colours.
 These 3 stitched images were done quite some time ago, but are based on the usual yellow form of the Gazania with the black central markings.
                I used many shades of yellow thread and lots of black and yellow beads.
All the small embroideries were mounted in a single frame with a black background and individual windows for each one. Unfortunately at this stage I can't locate a photo of the final presentation.

Sunday, 17 September 2017

I Only Want 7!

I had a blitz on the final printing of my little 15 x 15 cm image and managed to make 12 from which to choose the 7 that I need, 5 plus 2 artists proofs. Even so, I'm not all that sure that I have 7 without faults, but that's the nature of hand made items, there are minor faults to be expected.

Saturday, 16 September 2017

Almost There.

 This is almost what the final version will be, although I don't think that I will spray the printing paper with soft silver as I have here, and I think that the butterfly is perhaps one item too many.
Here is the image with all the component stamps that I have carved and used. I think that I will have to raise the base pattern a little too, in order to leave a space for the print number, title and name.

Thursday, 14 September 2017

Slow Stitching.

 A group that I belong to decided to embrace slow stitching and to use this hand stitching to make some small purses and bags for sale at the gift shop of the Embroiderers Guild up and coming exhibition titled 'Ebb & Flow'.
 I haven't done much hand stitching in decades, much preferring the speed and immediacy of machine stitching. However, to show willing I started this hand stitching on a piece of upholstery fabric left over from an old lounge suite that we no longer have. I backed the piece with 2 layers of soft muslin for support.
 Unfortunately I ran out of time to finish the hand stitching, so in order to have something to contribute, I finished the purse off with machine stitching. I used heavy perle thread in the bobbin to tie in with the hand work but working from the back, it was hard to line up the stitching with the pattern on the front.
Lined and with a small button made of wood it doesn't look too bad. At least it's finished, even if it isn't all 'slow stitching' !

Wednesday, 13 September 2017

Another Idea.

   I'm finding it very difficult to fit the various elements into the proscribed 15cm x 15cm format.
Here I'm carving a small bending piece of foliage to fit into the small jug and around the little teapot.
             A little piece of the stem is missing, but I'm not worried by that at all.
  The angle of the foliage isn't right and the flowers are too big, but apart from that, it might work!

Tuesday, 12 September 2017

Printing Again.

 Here I'm trying out various versions of the jugs & pots with flowers and a carved patterned base.
The finished art work needs to be 15 cm x 15 cm, which is not very big at all, so I'm having trouble fitting a pleasing design into that format. It's all a bit slap dash trying the placements out, so the insides and outlines of the various items don't line up at all well. It's just to get an idea of what comes next.

Monday, 11 September 2017

Spring!

 The first of the spring flowers seems to be various types of Camellias.  This one is particularly pretty I think. Some of the flowers on the very large shrub are all pink and others a combination of pink and white like this one is.
While there are lots of different shapes and colours of daffodils in the garden, I don't think that I've noticed this one before. They were all planted by a previous owner of the property and are just lovely in their variations.
                                              Two different daffodils shown in this photo.
The good old King Alfred variety with their classic colour and formation.
 

Sunday, 10 September 2017

Fungus and a Nest.

 When I first saw this fungus at the base of a tree stump I thought that someone had negligently dropped and left a piece of red plastic on the ground. Closer inspection showed this extraordinary bright red fungus. It seems to be very soft and has grown around a stem of grass and over a couple of leaves. What a colour!
Equally extraordinary is the choice of this place to build a nest. A spare electrical cord hanging in the garage seems an odd place to make a nest, but it would be hard for a predator to scale the metal walls and the corner of the garage is relatively quiet for most of the time. It's probably a wren's nest.

Saturday, 9 September 2017

The Grey Version.

Now that I have quite a few new stamps to play around with, I'm having fun working out different ways to use them. I rather like this grey version with the single red flower. The vessels need something to stand on however, so I'll need to work out what looks best. A table, tablecloth or just a pattern.

Friday, 8 September 2017

Return to the Small Jug.

 After making all the other jugs and pots into two stage prints, I returned to the original small jug and carved an outline version of it to be combined with the earlier solid colour one.
 Here are the 2 stages. I had forgotten that I had made some attempt to carve the markings on the jug.
Now combining the two stamps together this small jug fits with all the other stamps. I rather like the way the  markings on the original jug show through a little. The two stamps aren't quite lined up properly, but I'll work on that more carefully later.

Wednesday, 6 September 2017

Yet More Foliage.

 With the first stamp having a very definite bend to one side, it was obvious when I used it twice in one piece, so I needed another similar one with a bend to the other side! Done.
   Here are the two leaf stamps bending towards each other, with two different but similar flowers stamps.
                                                          A bit more playing around.

Tuesday, 5 September 2017

Stamp Play.

With a bit of time available for play I combined all my recent stamps to produce this colourful  image. Not the final version of course, but I'm getting an idea of how I need to progress.

Sunday, 3 September 2017

Leaves & Flowers.

 I don't usually have time for such an output of stamp carving, but Melbourne's winter weather just keeps going on and on, although we are now officially in spring, so the outdoor activities have been put on hold yet again. When carving stamps from the size blocks that are available, there are always masses of small off cuts left over. These make small stamp blocks and I always feel very virtuous using up the scrap material rather than starting a whole new block. Here are 3 small flowers that I made this afternoon, the one on the right didn't turn out very well, so I'm not sure that I'll ever use it.
                       Using the foliage that I have just carved with the new flower stamps.
 More foliage needed, so here is the beginning of a more complex stem and leaves. I have left the tops of 3 stems ready to have flowers added to them.
Although this works quite well, I don't like the flaring ends of the stems, so will perhaps trim them off eventually. I had envisioned flowers at a side angle to go onto the ends, but these 'full frontal' flowers don't quite fit.